Fluorescent Mineral Photographs
These photographs were taken with a Cannon G3 4 megapixel digital camera. This
camera can be remotely controlled using a USB cable attached to a PC. The PC
comes in handy to double check the focus of images and it is easier to use than
the small camera buttons in a dark room. The autofocus on this camera sometimes
gets confused by minerals, but for the most part the PC remote function works
well. For UV photos, exposure times of several seconds and a darkened room are required. Typically, UV exposures run in the 2 to 16
second time range at f8 with ASA 50. Lower ASA settings will have less noise in
the image, but they require longer exposures.
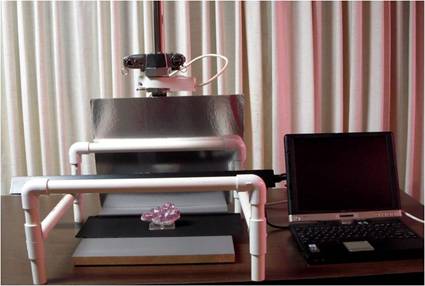
UV Photography setup with copy stand and PC for remote control.
A low-cost photographic copy stand was used to mount the camera and hold it steady for the long exposure times as seen in the photo above. A shelf was built above the copy stand using plastic PVC pipes and fittings to hold 25 watt SW, MW, and LW ultraviolet lights several inches above the flat surface of the copy stand where the specimens were placed. Black velvet fabric was used as a background on the base of the copy stand. The copy stand was enclosed using photographic lighting posterboard that has one side covered with reflective foil. This reflects the UV and helps minimize shadows and at the same time makes it less likely that you will get a sunburn from the UV when you take a lot of photos. A metallic surface like foil will reflect UV light, but a regular mirror does not work well since glass absorbs a lot of UV. A macro light ring was attached to the camera lens hood and used for normal light images. A UV or sky fog filter was used on the camera to help filter out UV light. On the G3, an optional lens hood is required to mount filters.
Reflected UV light can show up as a blue or purple haze on images and a UV filter helps minimize this problem. Some minerals seem to reflect UV light and these still may have a blue cast on the raw images from the camera. A can of Dust-Off is handy to clean small dust particles off of specimens and the velvet. Some dust particles will fluoresce brightly under UV.
Adobe Photoshop was used to edit the digital images from the camera on a PC.
Most UV images still come out with a bit too much blue. In some digital
cameras, you could attempt to adjust the color levels in the camera to
compensate for UV light sources, but it is easier to see the effects on a large
PC monitor. Photoshop image-> adjust -> curves -> blue was used to cut
down the blue levels by about 1/3 on the typical specimen to match the colors
you see with your eyes. This varies depending on the mineral and fluorescent
color. The magic wand tool was used to select the black velvet background
and change it all to black to hide any faint traces of the velvet fabric and
any dust or small particles on it. If you still wind up with a small dust
particle on a specimen, the clone tool or the dust and scratch filters are
handy.